Working With Digitalocean Serverless Functions
What is serverless function A.K.A Function as a Service (FaaS)?
Serverless functions (also known as Function as a Service) execute code statelessly on the Cloud. This means that they can do things like scale infinitely and run anywhere. Functions are blocks of code that run on demand without the need to manage any infrastructure. Instead of worrying about deploying and maintaining servers, the cloud infrastructure provides all needed resources. All you need to do is focus on the code in any language supported by the cloud infrastructure. There are many different serverless function providers, like Digitalocean Functions, AWS Lambda, Azure Functions
In the article, we will be deploying a simple python application (QR Code Generator) as a function to Digitalocean.
Requirements
The following requirements are required to follow along with this article
- Digitalocean account. Visit Digitalocean to create one.
- Digitalocean CLI tool. Download
- Python 3.11.x. Download
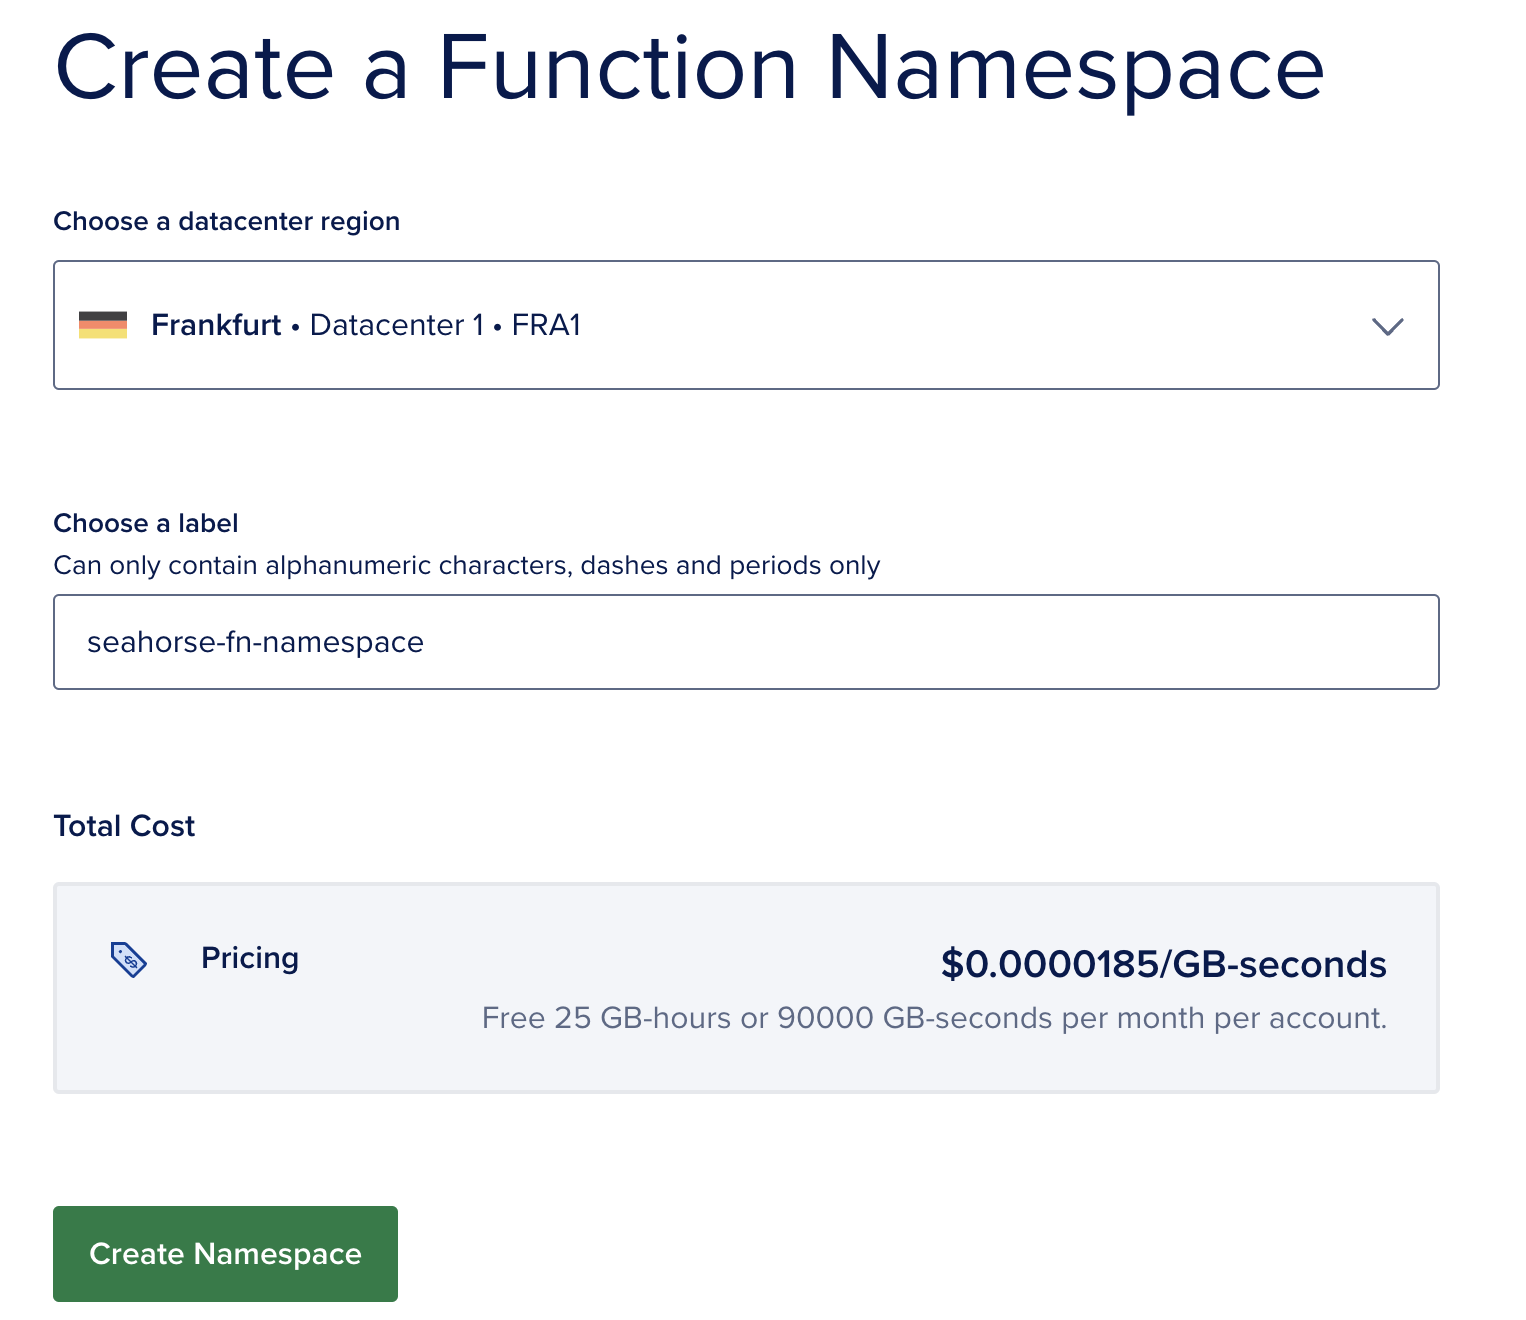
Step 1: Create a function namespace of Digital Ocean
- Visit https://cloud.digitalocean.com/functions/
- Click on Create Namespace button
- Select your preferred region and a namespace name
Step 2: Initialize the function project on your local machine
1
doctl serverless init --language python <project-name>
This commmand creates a directory with sample codes and project configuration file project.yml in the root directory of the project.
The project will have the following directory structure
1
2
3
4
5
6
project-name/
├── packages
│   └── sample
│       └── hello
│           └── hello.py
└── project.yml
As you can see from the directory structure, the project contain packages and each package contains functions. Note that each function is a directory on its own. All the codes for a function can be located inside the function directory. From example. the hello.py is residing inside the hello function directory
Let’s take a look at the project configuration file project.yml. The project.yml file is a YAML configuration file in the root directory of a project which lets you define environment variables, parameters, and other properties for the project and the packages and functions within it - see the docs.
Step 3: Create the QR Code package
- Inside the
packagesdirectory, create a new folder calledqrpkg - Inisde the
qrpkgdirectory, create a new directory calledqrcode - create a
__main__.pyinside theqrcodedirectory. This will be the entry point for our serverless function.
Below is the is code for the python QR function:
1
2
3
4
5
6
7
8
9
10
11
12
13
14
15
16
17
18
19
20
21
22
23
24
25
26
27
28
29
30
31
32
import qrcode
import base64
import io
from typing import Any, Dict


def main(event, context) -> Dict[str, Any]:
    qr = qrcode.QRCode(
        version=1,
        error_correction=qrcode.constants.ERROR_CORRECT_H,
        box_size=10,
        border=1,
    )
    data = event.get("data", None)
    if data is None:
        data = ""
    qr.add_data(data)
    qr.make(fit=True)

    img = qr.make_image(fill_color="black", back_color="white")

    # Convert image to base64-encoded data URI
    buffered = io.BytesIO()
    img.save(buffered)
    img_str = base64.b64encode(buffered.getvalue()).decode()
    data_uri = f"data:image/png;base64,{img_str}"

    return {
        "body": {
            "qrcode": data_uri,
        }
    }
Function main: This function accepts two arguments (event and context) and returns a dictionary. event usually contains the data that triggers the function, and context provides information about the runtime environment.
QR Code Generation: Initializes a QRCode object using the qrcode library with specified parameters (version, error correction, box size, and border). Gets the data from the event dictionary. If not provided in the event, defaults to an empty string. Adds the data to the QR code. Generates the QR code image using the make method of the QRCode object.
Conversion to Data URI: Converts the generated QR code image to a base64-encoded string. Creates a data URI (Uniform Resource Identifier) for the image, specifying that it’s a PNG image encoded in base64. Return Statement:
Returns a dictionary with a key “body” containing another dictionary with the key “qrcode” holding the data URI of the generated QR code image.
Next we need to add a requirements.txt file in the directory of the qrcode function. The following python package will be added to the requirements file: qrcode==7.4.2
Also, we need to a build.sh file to inform the cloud service that we need to run some scripts before deploying the function. The following script will install all the python packages in the requirements file:
1
2
3
4
5
6
7
8
9
10
11
#!/bin/bash

set -e

virtualenv --without-pip virtualenv

# Uncomment if you're using the Python 3.9 runtime
# pip install -r requirements.txt --target virtualenv/lib/python3.9/site-packages

# Uncomment if you're using the Python 3.11 runtime
pip install -r requirements.txt --no-cache-dir --target virtualenv/lib/python3.11/site-packages
Step 4: Deployment
You can deploy from CLI or using a deployment pipeline like Github Actions. In this case, we will deploy using the CLI.
Simplly run the following command to deploy the funtion:
1
doctl serverless deploy <project-dir>
In this example:
1
doctl serverless deploy qrcodefn